

How to Change a Toilet Flush Valve Seal: A Pro Plumber's Step-by-Step Guide
There is nothing quite like the phantom sound of a toilet flushing itself in the middle of the night to make you think your house is haunted. As a professional plumber, I get calls about this all the time. Homeowners think they need a brand-new toilet or a massive, expensive repair.
But here’s a insider secret: 9 times out of 10, that annoying phantom hiss or constant trickle of water is just a worn-out flush valve seal.
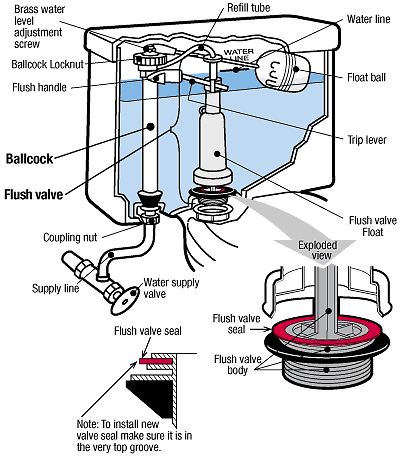
How a faulty flush valve seal causes a running toilet.
Source: Ideal Plumbing, Heating, Air & Electrical
Over time, the chemicals in city water (like chlorine) degrade the rubber or silicone gasket at the bottom of your tank. When that happens, water leaks slowly into the bowl, forcing your fill valve to kick on constantly to top things off. Not only is it irritating, but it also jacks up your water bill.
The good news? You don’t need to pay a plumber $150 to fix this. Changing a toilet flush valve seal is a straightforward, 15-minute DIY job. Let’s break down exactly how to do it right the first time.
Tools and Materials You'll Need
Before you stick your hands in the tank, make sure you have everything ready. You won’t need any heavy-duty power tools for this one.
A replacement flush valve seal (Make sure to buy the specific brand that matches your toilet, like Kohler, American Standard, or Mansfield, as they use different shapes. Standard flapper-style toilets might just need a traditional 2-inch or 3-inch flapper/seal).
A couple of old rags or towels (For wiping down the inside of the tank and catching drips).
Sponge (To soak up the remaining puddle of water at the bottom of the tank).
A pair of channel locks or slip-joint pliers (Usually optional, but handy if your specific model requires loosening a nut).
Step-by-Step: How to Change a Toilet Flush Valve Seal
Depending on whether you have a modern canister-style flush valve (common in newer Kohler and American Standard models) or a traditional rubber flapper, the process varies slightly. We'll focus on the modern canister style here, as it's the one that trips most people up, but the principles are exactly the same.
①Turn Off the Water Supply: Prerequisite.
Look behind your toilet tank near the floor. You’ll see a chrome valve connected to a water line. Turn that knob clockwise until it stops. This shuts off the fresh water coming into the toilet. If it's a quarter-turn valve, just give it a 90-degree twist.
②Drain the Tank Completely: Time: 2 mins.
Flush the toilet and hold the handle down until almost all the water drains out of the tank into the bowl. You'll be left with about an inch of residual water at the bottom. Take your sponge and soak that remaining water up, squeezing it out into the toilet bowl until the tank floor is bone dry.
③Remove the Canister or Flapper: Time: 3 mins.
If you have a modern tower/canister style: Unclip the refill tube from the center guide if there is one. Reach down, grab the center stem of the canister, and rotate it counter-clockwise (about a quarter turn). It should snap out of its plastic tracks, allowing you to lift the entire canister straight up and out of the tank.
④Ditch the Old, Slimy Seal: Time: 2 mins.
Look at the base of the canister or the bottom of the flush valve opening. You’ll see a colored rubber ring (often bright red, yellow, or blue). Peel that old seal right off. Be warned: it will likely leave black or colored oily residue on your fingers because the rubber is disintegrating. This is a great time to grab a wet rag and wipe the plastic rim (the seat) where the seal rests to ensure a perfectly clean surface for the new gasket.
⑤Install the New Flush Valve Seal: Time: 3 mins.
Take your brand-new seal and stretch it carefully into the groove at the base of the canister or flush valve. Make sure it sits entirely flat without any twists, bunches, or lips. If it isn't perfectly flush, it will leak from day one.
⑥Reassemble and Test Your Handiwork: Final Step.
Drop the canister back down into the center guide tube. Rotate it clockwise until you feel it click or lock back into its original tabs. Reattach the fill tube. Turn your water supply valve back on counter-clockwise and watch the tank fill up.
How to Test if the Leak is Actually Fixed
Once the tank is full, don't just walk away. Here is a classic plumber's trick to ensure your seal is functioning beautifully: The Dye Test.
Squeeze a few drops of blue or red food coloring into the toilet *tank* (not the bowl). Mix it up gently so the tank water changes color. Do not flush the toilet. Walk away for about 15 to 20 minutes.
When you come back, look closely at the water inside the toilet bowl.
* If the bowl water is crystal clear: Congratulations! Your new flush valve seal is holding perfectly.
* If the bowl water has turned blue or red: Water is still seeping past the seal. This means either the seal isn't seated properly in its groove, or the plastic flush valve seat itself is nicked, cracked, or dirty and needs to be cleaned or replaced entirely.
Pro Tips for DIY Toilet Maintenance
While you have your head inside the toilet tank, here are a few things to keep in mind to prevent future plumbing headaches:
Avoid Drop-in Bleach Tablets: Those blue or white chlorine bleach tablets you drop into the tank might keep your bowl smelling fresh, but they are a plumber's worst enemy. The highly concentrated chemicals sit in the stagnant tank water and eat away at rubber seals, plastic washers, and flappers, cutting their lifespan in half. Use in-bowl cleaners instead.
Check Your Water Level: Make sure the water level in the tank stops roughly a half-inch *below* the top of the overflow tube. If the water is constantly spilling over the top of that open tube, your problem isn't a bad flush valve seal—your fill valve is set too high or is failing to shut off.
How often should I change my toilet flush valve seal?
Generally, a high-quality silicone or rubber flush valve seal lasts between 3 to 5 years. However, if you live in an area with highly chlorinated city water or hard water full of mineral deposits, you might find yourself swapping them out every 2 years.
What’s the difference between a flapper and a flush valve seal?
A flapper is a hinged rubber cap that flips up and down every time you push the handle. A flush valve seal usually refers to the circular rubber ring found at the bottom of modern, column-shaped "canister" or "tower" flush mechanisms. They do the exact same job—keeping water inside the tank until you flush—but their mechanical designs are completely different.
Why is my toilet still running after replacing the seal?
If you've already changed the seal and water is still running into the bowl, check the plastic "seat" where the seal lands. Mineral buildup or debris can prevent a smooth seal. Clean it with an old toothbrush. If that doesn't work, your entire flush valve assembly might have a hairline crack and need to be replaced.
 Urinal Sensor Inlet Seal Gasket Factory Replacement
 Toilet Tank Fill Valve Conical Seal Factory Replacement
 Wholesale Toilet Cistern Inlet Valve Diaphragm Washers
 Conical Rubber Washers for Toilet Bolts Factory Wholesale